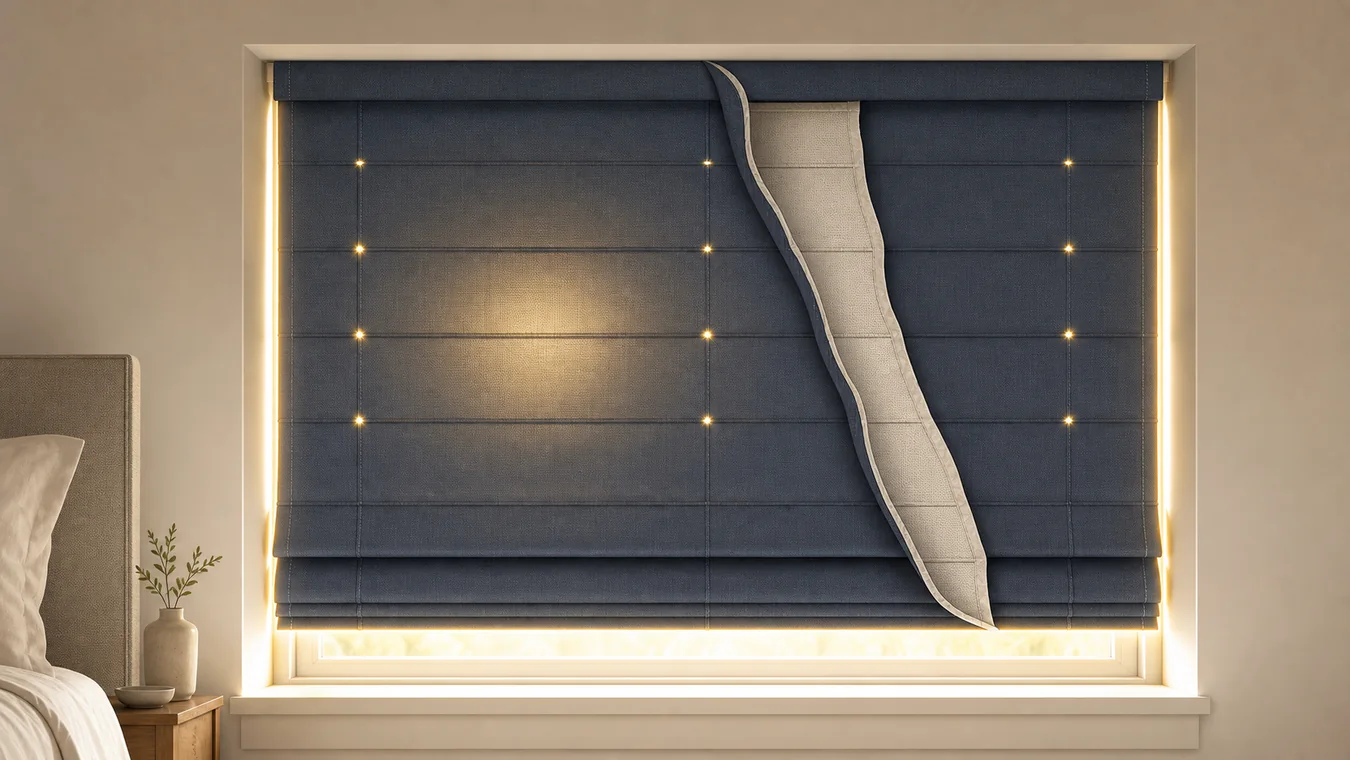
“Blackout” is doing too much work in many Roman-shade listings. It may describe the liner while saying nothing about tiny points of light in the fabrication or bright bands around the installed shade.
Treat a blackout Roman shade as three separate light-control problems: the shade body, the places where it is sewn or lifted, and the perimeter. If a quote cannot describe all three, it can still be a good room-darkening shade—but it has not established a near-dark room.
The blackout claim has three separate failure points
| Light path | What a product claim may establish | What can still go wrong | Evidence to request |
|---|---|---|---|
| Through the shade body | The named liner or material is designed to block light through its covered area. | Face fabric, liner coverage, color and sample behavior may differ; the claim says nothing about the window edges. | Exact face fabric and liner names, a backlit sample, and confirmation that the liner covers the finished panel. |
| Through the fabrication | The Roman shade can fold and lift in the selected style. | Seams, ring attachments or other lift points can puncture or interrupt a coated liner. | Fold style, rear-view construction, seam locations and the supplier’s stated method for controlling visible pinholes. |
| Around the perimeter | The finished shade covers the ordered opening. | Inside-mount deductions, uneven openings, headrail and bottom details, or insufficient outside overlap can leave light bands. | Ordered and finished dimensions, expected gaps, mount drawing, and any compatible side, top or bottom light control. |
The first row is about material. The second is about fabrication. The third is about geometry. One impressive swatch cannot answer the other two.
Make the liner prove the center of the shade
A liner belongs to an exact build, not to the word Roman. A current Blinds.com blackout Roman-shade configurator, for example, separates liner, fold and lift choices. That does not make it a universal specification; it shows why “blackout available” is incomplete without the finished combination.
The Shade Store describes blackout lining as a separate Roman-shade option that also adds fullness to the treatment. That can be desirable, but it means the approved sample should include the face fabric and liner together. A loose face-fabric swatch cannot show how the combined panel hangs, folds or looks from outside.
Use three sample views if darkness matters:
- Front-lit: judge the room-side color and texture.
- Backlit: look for transmission through the combined face and liner.
- Street-side: confirm the backing color and the appearance of seams or lift hardware.
Record the exact sample identity on the quote. “White blackout lining” without a product or construction reference is too vague to recreate after a revision.
Ask how the lift is attached before approving the folds
A Roman shade must gather into folds, which makes fabrication part of the light-control result. Workroom specialist Susan Woodcock explains how sewing through a coated blackout lining can create small pinholes of light. Her method discussion proves the issue is real and construction-dependent; it does not prove that every shade will show pinholes or that one fold style always wins.
The useful question is not “Do Roman shades have pinholes?” Ask: “On this fold style, where do seams and lift attachments pass through the blackout layer, and what will be visible when the shade is backlit?” Request a rear-view photo or drawing of the exact construction, not a staged front view of a different option.
Fold style may change seam placement, panel body and the way the shade stacks. Keep that choice connected to the exact liner and control system. If the supplier changes the fold to reduce visible punctures, reopen the appearance, stack and lift approval too.
Draw the light gap outside the fabric sample
Hunter Douglas Hospitality lists blackout lining and optional side channels as separate Roman-shade features. That commercial specification is not a promise about every residential product, but the distinction is useful: edge control is its own design decision, not a property that arrives automatically with the liner.
For an inside mount, request the supplier’s finished shade width and expected clearance—not just the recess width you submit. The operational clearance that helps a shade move can also create the bright line that wakes a daytime sleeper.
An outside mount can move the shade edges beyond the opening, but extra overlap is not free. It needs a flat mounting zone and may increase projection, raised bulk or conflicts with trim and hardware. Use the outside-mount Roman-shade geometry guide to close those trade-offs instead of guessing an overlap number.
If the target is more demanding than ordinary room darkening, ask whether the exact Roman system supports side channels or another engineered edge treatment. If it does not, a layered treatment may be more honest: the Roman shade can provide the fabric appearance while a separate, compatible layer handles perimeter light. Do not improvise channels around a product that was not designed to run in them.
A darker panel still needs the right control system
Do not choose cordless, continuous-loop or motorized operation from the product-family name alone. The completed width, drop, face fabric, liner, fold and control must be an allowed configuration. A motor icon beside a Roman-shade collection does not approve every lined panel.
For motorized builds, the motorized Roman-shade guide keeps fold behavior, raised stack, panel construction, motor and service access in one approval. For manual products, inspect the current control description and the back of the finished shade.
Cord safety is not only an operating-cord question. Current US Consumer Product Safety Commission guidance addresses operating cords on stock coverings and inner cords on stock and custom coverings. Choose a compliant completed product and confirm how any inner cords or loops are made inaccessible; do not infer safety from the word “cordless” on the front control alone.
Match the build to the darkness target
| Darkness target | A reasonable Roman-shade path | Evidence that matters most | When to escalate |
|---|---|---|---|
| Reduce glare and add night privacy | Opaque face fabric or a suitable liner with an ordinary fit may be enough. | Backlit sample, privacy at night and expected finished gaps. | Direct sun or exterior sightlines expose the perimeter. |
| Darken a normal bedroom | Blackout liner plus documented fabrication and deliberate edge coverage. | Combined sample, seam and lift construction, mount drawing and finished dimensions. | Early sun strikes an edge or the sleeper is light-sensitive. |
| Support daytime sleep or a nursery schedule | Treat small pinholes and bright perimeter bands as design inputs, not post-installation surprises. | Rear-view construction, backlit sample, coverage plan, safe controls and a mock-up where practical. | Use engineered edge control or layering when ordinary overlap cannot meet the target. |
| Seek near-total darkness for a media or sleep-critical room | Evaluate a complete light-control system, not a Roman panel alone. | Exact liner, fabrication, head, side and bottom treatment, installation tolerances and service constraints. | Reject a “blackout Roman shade” label that cannot document the complete system. |
These are specification paths, not guaranteed performance bands. Room geometry, surface reflectance, installation tolerances and light sensitivity vary. The room-by-room smart-shade planner helps define the outcome before you decide how much edge control the window deserves; the motorized blackout room guide handles broader fabric, mount and room trade-offs.
Turn the quote into a light-control specification
Before approving custom fabrication, make the supplier answer one sentence:
This shade uses [exact face fabric] with [exact liner], made as [fold and seam construction], lifted by [control], finished at [shade dimensions] on an [inside/outside] mount, with expected light paths at [body / fabrication / perimeter] addressed by [documented method].
Attach the backlit sample decision, a rear-view construction image and the mount drawing to the same quote. Record the opening and obstruction measurements in the Smart Shade Measurement and Compatibility Checker before the supplier turns them into order dimensions.
If the exact liner is unnamed, the rear construction is unavailable, or the finished gaps are described only as “standard,” the decision is not closed. Hold the order or accept in writing that the result is room darkening rather than a demonstrated near-dark system.