Do not move the brackets yet. “Blinds too short” can describe at least four different conditions: the covering is too narrow, its finished drop is too short, the headrail is mounted below the intended top line, or the product has stopped before the end of its normal travel. One remedy cannot fix all four.
Lower and close the covering only as its own instructions allow, then take a straight-on photo. Mark where the missing coverage appears—both sides, the bottom, the top, or one corner. That first distinction tells you whether to compare width, drop, mount position, level or operation.
Name the missing distance before you fix it
The four illustrated windows are not four styling choices. Each one assigns the apparent gap to a different record: finished width, finished drop, mounting line or controlled travel.
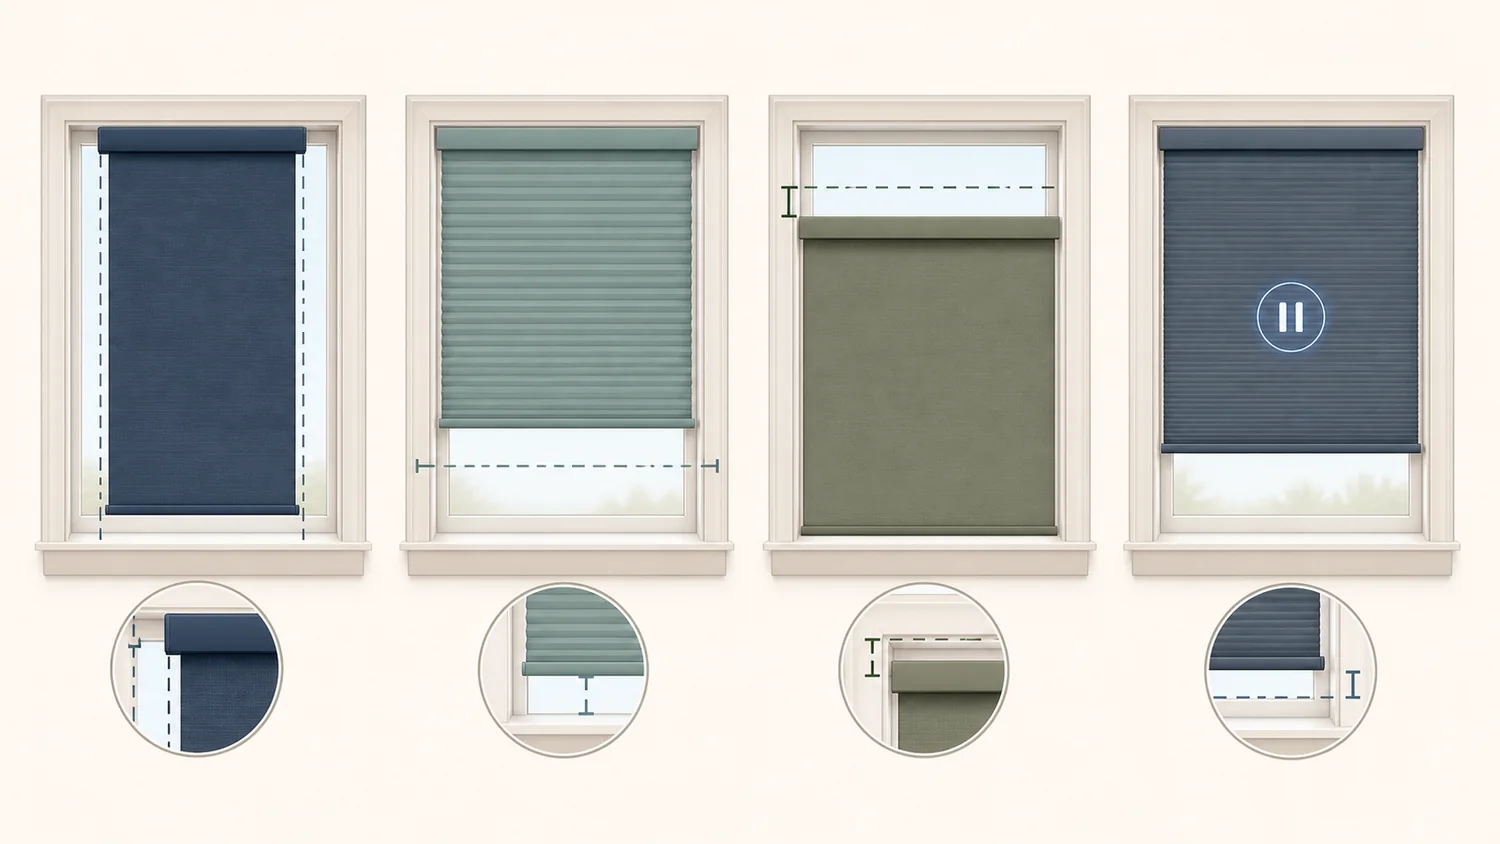
A side gap, bottom gap, lowered mounting line and early travel stop can look like one sizing problem from across the room. They do not share one remedy.
| What you see | Measure or observe next | Likely owner | Do not assume |
|---|---|---|---|
| Equal side gaps from headrail to bottom | Opening width, finished headrail width and actual material or slat coverage | Documented factory deduction, wrong order width or product-specific clearance | The headrail and material are the same width |
| Bottom rail stops level above the sill and cannot travel farther normally | Intended headrail-to-sill distance and finished top-to-bottom drop | Ordered height, factory output or an inherently shorter stock size | Lowering the brackets creates more material |
| Covering begins below the intended top line but reaches the desired bottom | Distance from intended mount line to actual headrail line | Installation position, subject to exact bracket and substrate approval | A filler or lower bracket position is structurally acceptable |
| One lower corner sits higher than the other | Headrail level, rail alignment, obstructions and whether material telescopes or racks | Installation or product operation | The entire blind needs a longer size |
| Both lower corners stop level, but the product should allow more travel | Exact model, control generation and documented lower-limit behavior | Product-specific operation or service | The fabric or slats were made too short |
If the symptom changes between open, tilted and fully closed states, photograph those states separately. A horizontal blind can cover the same opening differently as its slats tilt; a roller or cellular shade can have a headrail wider than its material. Judge the failed function—privacy, light control, sill reach or physical support—not just the largest visible component.
Build the record from the window outward
Keep four layers separate on one note.
- Opening and intended coverage. Record width, height, depth and obstructions using the exact seller or manufacturer’s method. LEVOLOR’s current measuring guide, for example, tells its inside-mount customers to measure width at the top, middle and bottom and keep the shortest value; it measures height at the left, middle and right and keeps the longest. Those are LEVOLOR instructions, not a rule to silently apply to every order.
- Order entry. Copy the width, height, mount type, product, operating system, options and any “order size” or “finished size” label exactly from the receipt. Do not reconstruct this layer from the carton or from memory.
- Finished product. Measure the headrail, the material or slat coverage, and the top of the installed assembly to the lowest physical edge. These are different values. A size label may not name the component you are looking at.
- Installed endpoint. Measure the side, top and bottom gaps with the covering at the documented closed or lower position. Record whether it stops level, whether the control reports an endpoint, and whether any obstruction, skew or unusual sound appears.
The Smart Shade Measurement Checker can keep the opening and mount observations together. If the seller’s size label still does not say whether it means order width, finished headrail or material width, decode that listing with the window blind size chart guide before deciding that the factory missed.
Now find the exact product’s deduction and tolerance record. A deduction is a planned change between the order input and the finished component. A tolerance is the permitted variation after that planned change; it is not a second deduction you invent.
Current LEVOLOR cellular specifications provide a useful product-specific example. For the listed standard corded, cordless, continuous-loop and motorized inside-mount configurations, the guide says the factory—not the customer—takes a 3/8-inch deduction and identifies a 3/16-inch light gap at each side. A separate LEVOLOR reference explains tolerance notation and, in its named example, lists blind-width tolerance of +0/−1/8 inch and height tolerance of −0/+1/4 inch. Those numbers prove why the order, deduction and finished result must be compared; they do not set an acceptance range for another brand or product.
Side gaps do not all mean the width is wrong
Start with symmetry. Equal left and right gaps usually show that the assembly is centered, but symmetry does not prove the gaps are intended. Compare the opening with the finished headrail and with the actual material or slat coverage. Then compare both finished values with the exact deduction and tolerance promised for that configuration.
If the finished measurement falls inside the documented range, the remaining gap may be operating clearance or the difference between headrail and material width. Decide whether that known clearance still meets the room’s privacy and light-control requirement. A technically expected gap can still make the product a poor choice for a bedroom; that is a replacement-selection problem, not evidence of bad fabrication.
If the headrail is too narrow but the brackets can hold it only after being moved inward, the mount question and the coverage question remain separate. Some merchants describe top-mounting and centering specific horizontal blinds, but moving hardware cannot widen the slats or fabric. It may preserve support while leaving larger side gaps. Use only the exact installation guide and a known support surface; do not copy a generic bracket or spacer method into an unidentified window.
Unequal gaps need a different inspection. Check whether the headrail is level and centered and whether the opening itself changes width. If roller material tracks toward one side, a rail bows, or one lower corner rises, stop calling the symptom a width error. That case needs installation or product service before any reorder calculation.
A bottom gap has three different owners
First test the physical-drop branch without forcing the product. If a manual blind reaches its normal lower state, both lower corners are level, and the finished headrail-to-bottom distance is shorter than the documented result, preserve the measurements and order record for the seller. Lowering the headrail can only move the whole assembly down: it creates or enlarges a top gap and may move the brackets onto a different support surface. It does not add slats, fabric or warranty coverage.
A top filler has the same geometric trade. One personal page in the current results shows a painted wood block making up a five-inch difference for one Venetian blind. That story does not establish the fastener, bracket, frame, load or warranty conditions for your product. Treat any filler as a product- and substrate-specific installation proposal that needs its own approval, not as a sizing fix.
The second branch is mount position. Compare the planned headrail line with the actual line. For an outside mount, LEVOLOR’s guide measures height from the intended headrail location to the sill or desired endpoint—so changing that line changes the required drop. If the product was ordered for one line and installed at another, resolve the bracket surface, clearances and exact installation instructions before deciding whether a documented remount can restore the intended coverage.
The third branch is travel. A powered shade that stops level above the sill may still have sufficient material. Hunter Douglas’s current support for named Applause and Duette PowerView products explicitly treats a shade stopping too high or too low as a travel-limit condition and splits procedures by product and manufacture date. That is evidence to identify the exact model and guide; it is not permission to run the same reset on another motorized shade. Preserve the current state and use the motorized-blind troubleshooting path or manufacturer service when travel, power or control is the failed layer.
Match the remedy to the failed record
| Evidence you can prove | Defensible disposition | What remains protected |
|---|---|---|
| Finished dimensions match the named deduction and tolerance, operation is normal, and the documented clearance meets the room task | Accept the fit | No unnecessary remount or claim |
| Finished size is correct, and the exact installation guide plus the actual support surface approve a different bracket position | Make one documented remount plan | Product support, clearances and warranty conditions |
| Product has enough physical drop but stops early, skews or binds | Use the exact operating guide, installer or manufacturer service | Existing settings and evidence of the fault |
| Finished width or drop is outside the seller’s documented result | Open a seller or fabricator claim before modifying the product | Return, remake and warranty evidence |
| Product is within specification but cannot provide the needed coverage from any approved mount | Select a different size, mount or product after remeasurement | The real privacy and light-control requirement |
| Product identity, order convention, support surface or finished-size rule is missing | HOLD the alteration and obtain that record | Reversible options and a clean evidence trail |
Do not cut an already undersized blind, open the headrail, alter lift or inner cords, or run a generic motor reset to make the case look more conclusive. If removal is required for an approved remount or return, identify the bracket first and use the blind-removal guide rather than pulling on an unknown release.
If the final disposition is replacement, re-enter the bare opening—not the undersized product—into the measurement checker. Then use the inside-versus-outside mount comparison to decide the new mounting boundary. The old blind is evidence of what failed; it is not the measurement template for the next order.
Before you ask for a remake, make the gap reproducible. Give the seller, installer or manufacturer one straight-on photo, close views of both gaps and the label, and four comparable records: the opening under their stated method, the exact order entry, the finished headrail/material/drop, and the remaining gap at the documented endpoint. Add the actual headrail line and a short note on whether the covering stops level and whether it can travel farther normally.
That record lets the right owner answer a narrow question: expected clearance, installation position, operating fault, factory variance or wrong specification. Until one of those is proved, leave the brackets and mechanism unchanged.