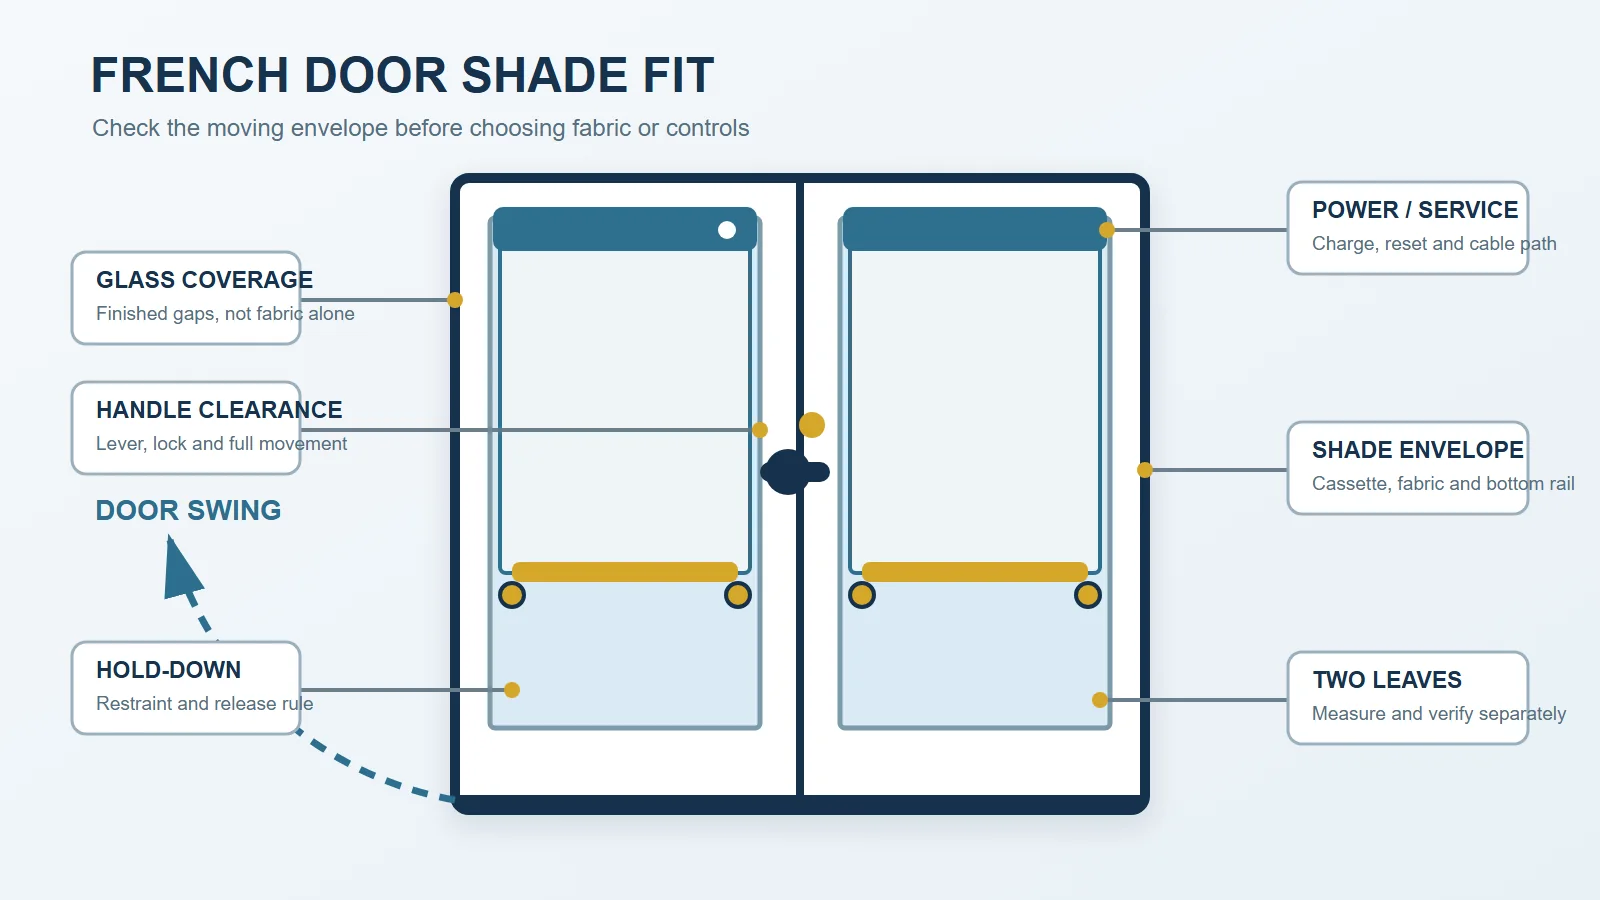
Before measuring fabric, close both French doors and move every part that already moves: turn the lever, operate the deadbolt, open the active leaf to its real stop, and repeat on the other side. The space swept by the hardware and doors is the no-shade zone.
Motorized blinds for French doors work only when the exact finished shade stays outside that zone while the door moves—and when the shade can travel, charge and reset in its own safe state. Glass width alone cannot prove any of that.
Map four operating states before choosing a shade
| Operating state | What moves or occupies space | Evidence to mark on the door drawing | What an unresolved field means |
|---|---|---|---|
| Door closed, shade travelling | Fabric, bottom rail, motor limits, lever/deadbolt and any restraint | Full shade travel plus hardware rotation and the hold-down release rule | The motor may drive the rail into hardware or an engaged restraint |
| Door opening, shade lowered | Complete door leaf, lowered shade, bottom rail and hold-down | Real swing to the normal stop; clearance to wall, other leaf, floor and passage | The lowered assembly may strike something or swing into the user path |
| Door opening, shade raised | Headrail/cassette, brackets, raised stack or roll and charging parts | Maximum finished projection through the whole door arc | A shade that clears the handle can still hit the wall or other door |
| Door parked for service | Charging connector, battery pack, reset button, local control and service tools | A reachable service position and cable route outside hinge, seal, latch and pinch zones | The system may fit on day one but be impractical to own |
The map is not an installation test. It is a pre-order drawing built from the exact seller’s finished dimensions and the real door movements. Make one for the left leaf and one for the right; a mirrored appearance does not prove mirrored hardware, trim or use.
Start with the door leaf that actually moves
French-door pairs are rarely used symmetrically. One leaf may open several times a day while the other stays latched until furniture, equipment or a wide object must pass. The active leaf deserves the most conservative movement and service plan, but the usually inactive leaf still needs a valid configuration for the day it is released.
Label the doors from the room side—left and right—then record:
- which leaf is active and how each leaf is secured;
- inward or outward swing and the maximum angle used in the real room;
- lever, knob, deadbolt, flush bolt and latch movement;
- glass and trim dimensions at more than one point;
- flat mounting area and the projection of molding or raised trim;
- the nearest wall, stop, cabinet, floor obstruction and opposite leaf.
Use the Smart Shade Measurement and Compatibility Checker to keep those facts separate. It organizes evidence; the exact shade maker or responsible measurer still owns final order dimensions.
This page is for hinged leaves. If the opening slides or the main problem is panel stack, passage clearance or a very wide span, use the sliding-door and large-opening shade guide instead. A sliding-door split is not a shortcut for French-door swing geometry.
Choose whether the shade travels with the door
There are two layout classes worth resolving before fabric or motor selection.
One shade on each leaf preserves independent door use and keeps the covering close to its glass. In return, every shade component travels through the room with the door. Each leaf needs its own finished envelope, restraint rule, power/service position and control identity. Two visually matching shades may still require different hardware clearances.
A shade fixed above the pair keeps the shade hardware off the moving leaves. It also turns the entire doorway into one opening: the shade may need to be fully raised before either door can be used, the span must fall within the exact product’s limits, and the raised assembly needs room above the doors. This is a layout to verify, not a universal recommendation.
Choose the class whose normal operating rule matches the room. A frequently used exterior door generally cannot depend on occupants remembering to raise a single across-door shade every time unless that behavior is deliberate and acceptable. Conversely, a leaf-mounted configuration is not viable merely because it preserves passage; it still has to clear hardware and the door arc.
Handle clearance belongs to the finished shade
An order width and a catalog “depth” do not describe the object that will be attached to the door. Request the installed envelope of the exact configuration:
- headrail or cassette width, height and projection;
- bracket, spacer or approved extension projection;
- roll direction or the location of cellular/Roman material as it travels;
- raised roll or stack dimensions;
- bottom-rail depth, end caps and movement;
- charging port, connector and battery-pack clearance;
- hold-down position and the space needed to engage or release it;
- expected top, bottom and side coverage.
Hunter Douglas notes that French-door treatments may involve outside mounting, spacer or extension hardware, handle cut-outs and hold-downs. Those are configuration possibilities, not proof that a particular combination fits a particular door.
Measuring rules also belong to the selected seller and product. SmartWings publishes a door-specific process with multiple measurements and its own coverage allowances, while Blinds.com separates measuring paths and tells buyers to account for handles and other obstructions. Neither set of rules creates a universal French-door addition or deduction.
Overlay the finished shade envelope on a straight-on door photo, then add a side view for projection. Draw the lever through its full rotation rather than marking only its resting position. Extend the cassette and bottom rail through the real door arc. If a seller supplies only the fabric width or a nominal headrail depth, the collision map is still missing its most important dimensions.
The inside-versus-outside mount guide can help define the mount plane, overlap and obstruction vocabulary. It does not authorize a spacer, handle cut-out or attachment that the exact shade documentation does not support.
A hold-down changes the automation sequence
A bottom rail that hangs freely may swing when the door accelerates or stops. A hold-down can restrain an approved rail, but it introduces a second operating mode:
- door-moving mode: the shade may be lowered and restrained while the leaf moves;
- shade-moving mode: the rail must be free to travel through its motor limits.
The exact product must explain how those modes transition. Ask whether the restraint is approved for that bottom rail and mount, how it attaches, whether the user must release it, and what happens when a schedule or voice command runs while it is engaged.
A LEVOLOR guide illustrates why the rule must be product-specific: for the documented system, its magnetic hold-down is associated with outside mounting, reduces swaying and is released before shade operation. That example cannot be transferred to a different motor, rail or magnetic accessory.
If motor operation depends on a manual release, write that dependency into the control plan. An automatic schedule that can start against an engaged restraint is not a completed automation design, even if the app pairing works perfectly.
Mount permission can eliminate an otherwise good layout
Clearance answers where a shade could fit. It does not answer whether the proposed door surface can receive that mount.
Identify the material and construction only from reliable door documentation or the responsible manufacturer/installer. Raised molding, thin skins, internal glass units, warranties, rental restrictions and fire or exit requirements can change what is permitted. A generic “no-drill,” adhesive or spacer label is not evidence for this door.
Ask the shade seller for the exact installation guide and the door owner or manufacturer for any permission the project requires. Keep the decision at requirements level: approved mounting surface, approved hardware and responsible installer. Do not invent screw locations, fastener capacity, adhesive performance or a way to route wiring through the leaf.
This boundary is useful because it can redirect the layout early. If leaf mounting is not approved, investigate a properly supported above-pair configuration rather than forcing a nominally slim product onto an unsuitable door.
Give power a park-and-service position
Power selection should start with the state in which someone will charge, replace, reset or service the motor. Mark that service position on the same movement drawing.
For a rechargeable configuration, record the port location and connector direction, the clearance needed to attach it, and where the cable will run temporarily. It must stay out of the hinge, seal, latch and closing path. Do not assume a catalog cable length or charging interval applies until the exact motor documentation states it.
For a replaceable pack, mark the removal direction and the space required to handle it without taking down the shade. For a wired configuration, require a qualified, documented design for the transition to a moving leaf or choose a layout that keeps powered hardware on the fixed structure. A cable improvised across a hinge or door skin is not a planning solution.
Hunter Douglas documents rechargeable and hardwired paths within its PowerView family. This establishes that different power architectures exist, not that every shade, motor or French-door configuration offers both.
Keep local operation on the exact specification along with app, bridge, hub and ecosystem functions. Brand-level “smart” language does not prove the quoted motor supports a feature, and a network outage should not leave a frequently used doorway without a practical control.
Privacy is decided at five edges
For a shade mounted on each leaf, the installed result is shaped by five boundaries: top, bottom, hinge side, handle side and the center meeting line between the doors. A fabric sample describes none of those gaps.
Write the actual room outcome. Daytime glare reduction, nighttime privacy, retained view and stronger room darkening are different jobs. Then request the exact material and a finished coverage or gap drawing. Handle clearance or a cut-out can increase exposure on one side; two individually sized shades can create a visible center seam even when both fabrics are opaque.
Test privacy as a sightline, not a label: where is the viewer, which interior lights are on, and which edge could reveal the room? Treat “blackout” as a material description unless the seller documents the installed perimeter result. Treat “light filtering” as unknown for nighttime privacy until the exact material and room conditions are assessed.
This is also where left/right asymmetry matters visually. Solving a deeper handle on the active leaf with extra offset may produce different coverage from the other side. The quote should show that trade-off rather than hiding it behind identical fabric names.
Make the marked door drawing own the quote
Send one full-door photo and one side/projection view for each leaf, marked with:
- active/inactive use, swing direction and real stop;
- hardware travel and door-swing no-shade zones;
- exact finished headrail, fabric path, bottom rail and restraint;
- approved mounting surface and attachment owner;
- charging/reset/service position;
- expected perimeter coverage and center seam;
- exact motor, power, local control and any app/bridge package;
- every dimension or operating rule still awaiting an owner.
Ask the seller to return the drawing or an equivalent configuration sheet with its exact product dimensions and assumptions. That is more useful than a verbal “it should clear.” It also makes substitutions visible: a different motor, cassette, roll direction, bottom rail or restraint changes the drawing and must be checked again.
Approve one marked door drawing that shows the moving leaf, handle sweep, finished shade, hold-downs, power access, and privacy gaps. If the supplier will not return those dimensions in writing, the shade is not ready to be custom-made.